

In other posts, we explained how to apply Object Detection in Tensorflow and Object Detection using YOLO. Today we will provide a practical example of how we can use “Pre-Trained” ImageNet models using Keras for Object Detection. For this example, we will consider the Xception model but you can use anyone from the list here. The table below shows the size of the pre-trained models, their performance and their complexity in terms of parameters of the Convolutional Neural Network Architecture.
| Model | Size | Top-1 Accuracy | Top-5 Accuracy | Parameters | Depth |
|---|---|---|---|---|---|
| Xception | 88 MB | 0.790 | 0.945 | 22,910,480 | 126 |
| VGG16 | 528 MB | 0.713 | 0.901 | 138,357,544 | 23 |
| VGG19 | 549 MB | 0.713 | 0.900 | 143,667,240 | 26 |
| ResNet50 | 98 MB | 0.749 | 0.921 | 25,636,712 | – |
| ResNet101 | 171 MB | 0.764 | 0.928 | 44,707,176 | – |
| ResNet152 | 232 MB | 0.766 | 0.931 | 60,419,944 | – |
| ResNet50V2 | 98 MB | 0.760 | 0.930 | 25,613,800 | – |
| ResNet101V2 | 171 MB | 0.772 | 0.938 | 44,675,560 | – |
| ResNet152V2 | 232 MB | 0.780 | 0.942 | 60,380,648 | – |
| ResNeXt50 | 96 MB | 0.777 | 0.938 | 25,097,128 | – |
| ResNeXt101 | 170 MB | 0.787 | 0.943 | 44,315,560 | – |
| InceptionV3 | 92 MB | 0.779 | 0.937 | 23,851,784 | 159 |
| InceptionResNetV2 | 215 MB | 0.803 | 0.953 | 55,873,736 | 572 |
| MobileNet | 16 MB | 0.704 | 0.895 | 4,253,864 | 88 |
| MobileNetV2 | 14 MB | 0.713 | 0.901 | 3,538,984 | 88 |
| DenseNet121 | 33 MB | 0.750 | 0.923 | 8,062,504 | 121 |
| DenseNet169 | 57 MB | 0.762 | 0.932 | 14,307,880 | 169 |
| DenseNet201 | 80 MB | 0.773 | 0.936 | 20,242,984 | 201 |
| NASNetMobile | 23 MB | 0.744 | 0.919 | 5,326,716 | – |
| NASNetLarge | 343 MB | 0.825 | 0.960 | 88,949,818 | – |
Image Classification with Xception
from keras.applications.xception import Xception
from keras.preprocessing import image
from keras.applications.xception import preprocess_input, decode_predictions
import numpy as np

import PIL
from PIL import Image
import requests
from io import BytesIO


# load the model
model = Xception(weights='imagenet', include_top=True)


# chose the URL image that you want
URL = "https://images.unsplash.com/photo-1529429617124-95b109e86bb8?ixlib=rb-1.2.1&ixid=eyJhcHBfaWQiOjEyMDd9&auto=format&fit=crop&w=500&q=60"


# get the image
response = requests.get(URL)
img = Image.open(BytesIO(response.content))
# resize the image according to each model (see documentation of each model)
img = img.resize((299,299))

##############################################
# if you want to read the image from your PC
#############################################
# img_path = 'myimage.jpg'
# img = image.load_img(img_path, target_size=(299, 299))
#############################################


# convert to numpy array
x = image.img_to_array(img)
x = np.expand_dims(x, axis=0)
x = preprocess_input(x)

features = model.predict(x)

# return the top 20 detected objects
label = decode_predictions(features, top=20)
label
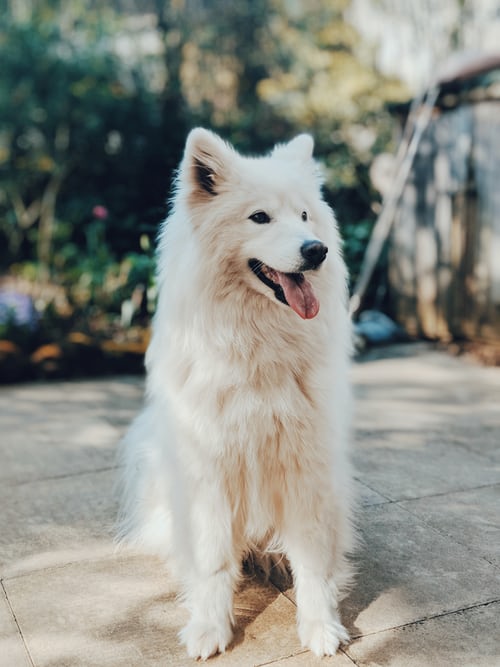
The image that we chose is the following:
And the labels that we get are:
[[('n02111889', 'Samoyed', 0.781301),
  ('n02114548', 'white_wolf', 0.124226466),
  ('n02120079', 'Arctic_fox', 0.005746077),
  ('n02111500', 'Great_Pyrenees', 0.0033085805),
  ('n02104029', 'kuvasz', 0.00311469),
  ('n02112137', 'chow', 0.0028483241),
  ('n02112018', 'Pomeranian', 0.0028328209),
  ('n02109961', 'Eskimo_dog', 0.002488005),
  ('n02106030', 'collie', 0.0016986788),
  ('n02085782', 'Japanese_spaniel', 0.0008878598),
  ('n02114367', 'timber_wolf', 0.0007279106),
  ('n02134084', 'ice_bear', 0.0007163896),
  ('n02112350', 'keeshond', 0.00068674894),
  ('n02098286', 'West_Highland_white_terrier', 0.00066097657),
  ('n02123394', 'Persian_cat', 0.0005676047),
  ('n02106166', 'Border_collie', 0.0005447453),
  ('n02105056', 'groenendael', 0.00047748425),
  ('n02099601', 'golden_retriever', 0.00039739575),
  ('n02094114', 'Norfolk_terrier', 0.0003679685),
  ('n02085936', 'Maltese_dog', 0.00032893682)]]
We chose to return the top 20 most likely detected objects. The tuple has three elements, the first one is referred to the ObjectID, the second one to the Object Label and the third one to the Probability. So let’s say that we want to get all the objects which have a probability higher than 5%. Then we can type:
[tpl[1:3] for tpl in label[0] if tpl[2]>0.05]
[('Samoyed', 0.781301), ('white_wolf', 0.124226466)]As we can see, the Xception model detected as the most likely objects in the image the “Samoyed” and the “white_wolf“. The model did a good job since the breed that we chose was Samoyed! Feel free to test it with other objects. Just notice that it tries to detect one object. For detecting many objects in one image we will discuss in another post!
Note: The pre-trained models in Keras try to find out one object per image. Thus, it is like a classification algorithm where it assigns for every object one probability and all of them ad up to 1. That being said, it cannot detect multiple objects in one image.


3 thoughts on “Image Classification with Pre-Trained Models in Keras”
is this object detection example , i dont see the bounding boxes
This is not object detection, it is image classification.
I see that you note this at the bottom of the post, perhaps you should change the title of the post to avoid being misleading.
Done!