As a Data Scientist, you may work in both R and Python and it is common to prefer one language over the other for some specific tasks. For example, you may prefer R for Statistics, Data Cleansing and Data Visualizations and you may prefer Python for NLP tasks and Deep Learning. Also, when it comes to Restful APIs, Python Flask APIs have an advantage over R Plumber and Restrserve.
The Scenario
Assume that you have built a model in Python and on top of that, you have built a Flask API. Regarding the UI, you prefer to work with Shiny. So, the scenario is that you want to share your Python Flask API using R Shiny. Let’s see how we can do it with a hands-on example.
The Flask API
We have provided an example of a Flask API for Sentiment Analysis. For convenience, we provide the code below:
The requirements.txt file is the following:
certifi==2020.12.5
chardet==4.0.0
click==7.1.2
Flask==1.1.2
idna==2.10
itsdangerous==1.1.0
Jinja2==2.11.3
MarkupSafe==1.1.1
requests==2.25.1
urllib3==1.26.3
vaderSentiment==3.3.2
Werkzeug==1.0.1
The application.py file:
from flask import Flask, request, jsonify
from vaderSentiment.vaderSentiment import SentimentIntensityAnalyzer


analyzer = SentimentIntensityAnalyzer()


application = Flask(__name__)

def get_sentiment(my_text):
    vs = analyzer.polarity_scores(my_text)

    sentiment = ''
    if vs['compound'] >= 0.05:
        sentiment = 'Positive'
    elif vs['compound'] <= -0.05:
        sentiment = 'Negative'
    else:
        sentiment = 'Neutral'

    return(sentiment)


@application.route("/endpoint", methods=['GET','POST'])
def sentiment_endpoint():
    if request.method == 'POST':
        json_dict = request.get_json()
        if 'my_text' in json_dict:
            result = get_sentiment(json_dict['my_text'])
            return jsonify({'output' : result})
        else:
            return jsonify({
                "status": "failed",
                "message": "parameter 'my_text' is required!"
            })

    if request.method == 'GET':

        my_text = request.args.get('my_text')
        result = get_sentiment(my_text)
        return jsonify({'output' : result})


if __name__=='__main__':
    application.run()
Call an API with R
We will provide an example of how you can call the above Flask API with R. For this example, we run the API locally, that is why the URL is http://127.0.0.1:5000 and the sentiment analysis, the route is the endpoint that is why we will call the http://127.0.0.1:5000/endpoint URL.
Let’s get the sentiment of the sentence:
What a great experience! I feel really happy 🙂
library(jsonlite)
library(httr)


url="http://127.0.0.1:5000/endpoint"

body<-list(my_text="What a great experience! I feel really happy :)")

b<-POST(url, body = body, encode = "json")

t1<-content(b, type="application/json")

t1
Output:
$output
[1] "Positive"
As expected, the sentiment of the sentence was positive.
Build a Shiny Application
We have provided an example of How to Share your Machine Learning Models with Shiny. It would be helpful to have a look at it since we will apply the same architecture.
The Shiny Application will have two functionalities
- To get a phrase as input and to return the sentiment such as “positive“, “neutral“, “negative“.
- To has an option to upload a
.txtfile, tab-separated with many phrases and to return a .txt file by adding a column of the sentiments.
Let’s build the Shiny App:
library(shiny)
library(DT)
library(tidyverse)
library(jsonlite)
library(httr)


# Define UI for application that draws a histogram
ui <- fluidPage(

    # Application title
    titlePanel("Sentiment Analysis"),

    # Sidebar with a slider input for number of bins
    sidebarLayout(
        sidebarPanel(

            textInput("caption", label="Enter your text here.", value="", placeholder = "Phrase to get a Sentiment..."),
            verbatimTextOutput("value"),


            # Input: Select a file ----
            fileInput("file1", "upload csv file here",
                      multiple = FALSE,
                      accept = c("text/csv",
                                 "text/comma-separated-values,text/plain",
                                 ".csv")),


            # Button
            downloadButton("downloadData", "Download the Predictions")
        ),

        # Show the table with the predictions
        mainPanel(
            verbatimTextOutput("Sentiment"),
            DT::dataTableOutput("mytable")
        )
    )
)

# Define server logic required to draw a histogram
server <- function(input, output) {


    reactiveDF<-reactive({
        req(input$file1)
        df <- read.csv(input$file1$datapath, sep="\t", stringsAsFactors = FALSE)

        url="http://127.0.0.1:5000/endpoint"


        fdf<-NULL
        for (i in 1:nrow(df)) {
            body<-list(my_text=df[i,1])
            b<-POST(url, body = body, encode = "json")
            t1<-content(b, type="application/json")
            tmpdf<-data.frame(InputText=df[i,1], Sentiment=t1$output)

            fdf<-rbind(fdf, tmpdf)
        }
        return(fdf)


    })

    output$mytable <- DT::renderDataTable({
        req(input$file1)

        return(DT::datatable(reactiveDF(),  options = list(pageLength = 100), filter = c("top")))
    })

    reactiveInput<-reactive({
        req(input$caption)


        url="http://127.0.0.1:5000/endpoint"


        body<-list(my_text=input$caption)

        b<-POST(url, body = body, encode = "json")

        t1<-content(b, type="application/json")


        df<-data.frame(Sentiment=t1$output)

        return(df)

    })

    output$Sentiment<-renderText({

        req(input$caption)
        reactiveInput()$Sentiment

    })


    # Downloadable csv of selected dataset ----
    output$downloadData <- downloadHandler(
        filename = function() {
            paste("data-", Sys.Date(), ".csv", sep="")
        },
        content = function(file) {
            write.csv(reactiveDF(), file, row.names = FALSE)
        }
    )


}

# Run the application
shinyApp(ui = ui, server = server)
Get the Sentiments
Let’s see how the Shiny App works.
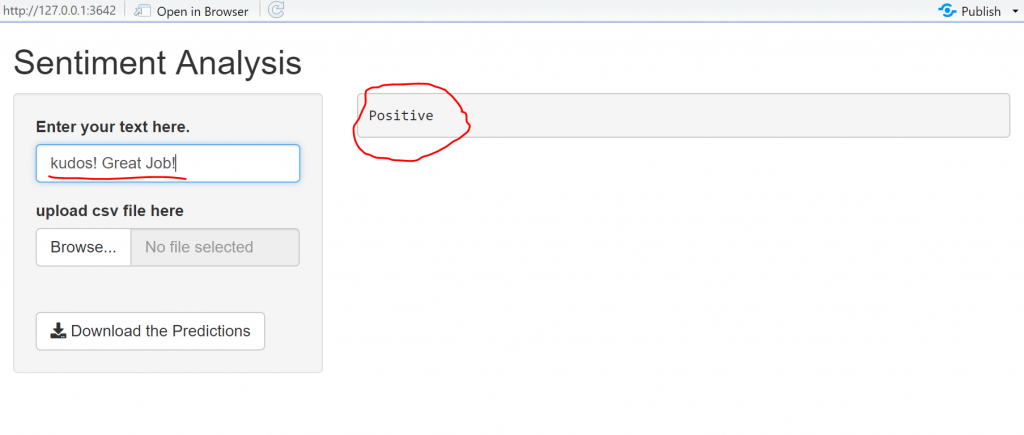
Get the Sentiment of a document in an interactive way
Let give as input the following input:
kudos! Great job!
As we can see, the Shiny App give us the chance to give the input in and it returns the sentiment in an interactive way

Get the Sentiment of multiple documents in an interactive way
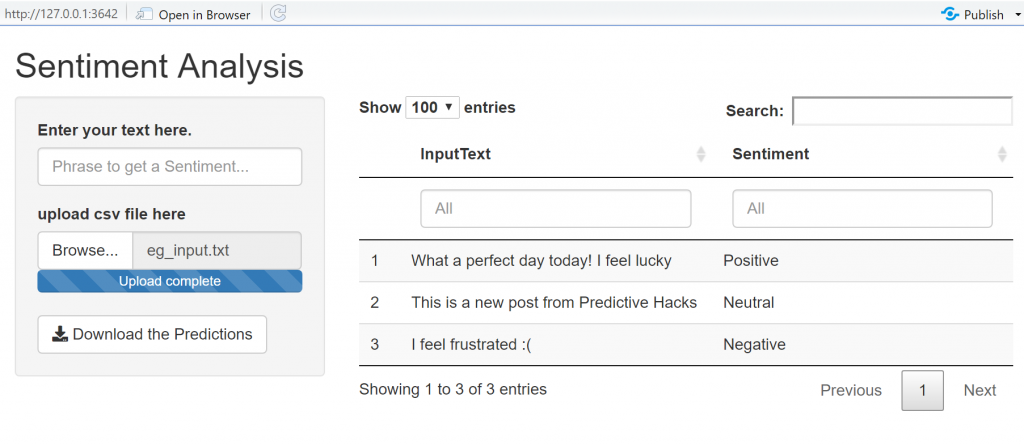
In case we have many documents, like thousands of reviews, and we want to get the sentiment of each one, the Shiny App gives us the option to upload the data and it also to download them with an extra column of the sentiment score.
The input file

Let’s upload it to Shiny and get the results:

As we can see, it accepted as input the txt file and it returned the input text with the predicted sentiments. We can also download the file which is the following:

The Takeaway
The takeaway is that you can work with Python and Flask APIs for the backend part and to work with the Shiny for the front end to share your models as applications. So, let’s keep in mind that Shiny can be an alternative to Flask jinja.


