We have started a series of articles on tips and tricks for data scientists (mainly in Python and R). In case you missed Vol. 1, you can have a look here.
Python
1. How to create files from Jupyter
While working with the Jupyter Notebook, sometimes you need to create a file (e.g. a .py file). Let’s see how we can do it via Jupyter Notebook.
To write a file, we can simply type %%writefile myfile within a Jupyter cell and then start writing the file. For example, the command below will create a new file called myfile.py:
%%writefile myfile.py
def my_function():
    print("Hello from a function")
If we want to see the content of the file, we can type !cat myfile.py.
Let’s say that we want to add something to our file. We can use the parameter -a that comes from the append. For example, if we want to add my_function()to our file:
%%writefile -a myfile.py
my_function()
As you can see, we added my_function() to the myfile.py:

To run the script, we can simply use the !python myfile.py command or type %run -i myfile.py:

2. How to get values by row based on column name
Let’s assume that you want to get the corresponding value of a pandas DataFrame according to a reference column. For example:
import pandas as pd
df = pd.DataFrame.from_dict({"V1": [66, 57, 79,75], "V2": [41,85,94,71],
                             "V3":[19,3,38,58], "Selection":['V1','V3', 'V2','V3']})
df
   V1  V2  V3 Selection
0  66  41  19        V1
1  57  85   3        V3
2  79  94  38        V2
3  75  71  58        V3
We want to get a new column according to the Selection column, where the first value will be the corresponding value of the V1 column, the second value will be the corresponding value of the V3 column, and so on.
The lookup function:
df['Value'] = df.lookup(df.index, df.Selection)
df
   V1  V2  V3 Selection  Value
0  66  41  19        V1     66
1  57  85   3        V3      3
2  79  94  38        V2     94
3  75  71  58        V3     58
3. How to create word clouds from dictionaries
Sometimes we want to create custom word clouds by defining the frequencies of the words.
import matplotlib.pyplot as plt
from wordcloud import WordCloud
# assume that this is the dictionary, feel free to change it
word_could_dict = {'Git':100, 'GitHub':100, 'push':50, 'pull':10, 'commit':80,
                    'add':30, 'diff':10, 'mv':5, 'log':8, 'branch':30, 'checkout':25}
wordcloud = WordCloud(width = 1000, height = 500).generate_from_frequencies(word_could_dict)
plt.figure(figsize=(15,8))
plt.imshow(wordcloud)

4. How to check if a pandas df column contains a specific value
Let’s try to see if the character a exists in any pandas DataFrame column.
import pandas as pd
df = pd.DataFrame({"A"  : ["a", "b", "c"], "B" : ["d", "e", "f"], "C" : ["x", "y" , "a"]})
df
   A  B  C
0  a  d  x
1  b  e  y
2  c  f  a
We can simply type:
(df=='a').any()
A     True
B    False
C     True
5. How to write multiple pandas DataFrames to Excel tabs
Let’s assume that you have many pandas DataFrames and you want to save them to a single Excel file of many worksheets (tabs). Let’s see how we can do it:
# create the xlswriter and give a name to the final excel
# for example Final.xlsx

writer = pd.ExcelWriter('Final.xlsx', engine='xlsxwriter')

# it is convenient to store the pandas dataframes in a
# dictionary, where the key is the worksheet name that you want to give
# and the value is the data frame
df_dict = {'My_First_Tab': df1, 'My_Second_Tab': df2,
        'My_Third_Tab':df3, 'My_Forth_Tab':df4}
#iterate over the data frame of dictionaries
for my_sheet, dframe in  df_dict.items():
    dframe.to_excel(writer, sheet_name = my_sheet, index=False)

# finaly you have to save the writer
# and the Final.xlsx has been created
writer.save()
R
6. How to get values by row based on column name
Similarly to what we did in Python:
set.seed(5)
df<-as.data.frame(matrix(sample(1:100,12),ncol=3))
df$Selection<-c("V1","V3","V2","V3")
df
  V1 V2 V3 Selection
1 66 41 19        V1
2 57 85  3        V3
3 79 94 38        V2
4 75 71 58        V3
We apply the following trick:
df$Value<-as.numeric(df[cbind(seq_len(nrow(df)), match(df$Selection,names(df)))])
df
  V1 V2 V3 Selection Value
1 66 41 19        V1    66
2 57 85  3        V3     3
3 79 94 38        V2    94
4 75 71 58        V3    58
7. dplyr join on multiple columns
dplyr allows us to join two DataFrames on more than a single column. All you have to do is to add the columns within by (e.g. by = c("x1" = "x2", "y1" = "y2")). For example:
library(dplyr)
set.seed(5)
df1 <- tibble(
    x1 = letters[1:10],
    y1 = LETTERS[11:20],
    a = rnorm(10)
)
df2 <- tibble(
    x2 = letters[1:10],
    y2 = LETTERS[11:20],
    b = rnorm(10)
)
df<-df1%>%inner_join(df2, df2, by = c("x1" = "x2", "y1" = "y2"))
df
# A tibble: 10 x 4
   x1    y1          a      b
   <chr> <chr>   <dbl>  <dbl>
 1 a     K     -0.841   1.23
 2 b     L      1.38   -0.802
 3 c     M     -1.26   -1.08
 4 d     N      0.0701 -0.158
 5 e     O      1.71   -1.07
 6 f     P     -0.603  -0.139
 7 g     Q     -0.472  -0.597
 8 h     R     -0.635  -2.18
 9 i     S     -0.286   0.241
10 j     T      0.138  -0.259
8. Feature engineering with dates
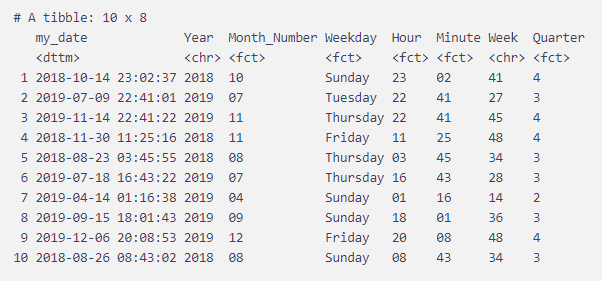
When we get the DateTime of the events, we can generate some features for machine learning models. For example, we can generate the:
- Year
- Month
- Weekday
- Hour
- Minute
- Week of the year
- Quarter
Let’s see how we can generate these features in R from a DateTime object. I would suggest converting some features like weekdays, months, hours, etc. to factors for machine learning purposes. Better yet, you should create more features like:
- A boolean called
isWeekendtaking1for weekends and0otherwise. - The period of the day (e.g.
Morning,Afternoon,Evening).
library(tidyverse)
set.seed(5)
df<- tibble(my_date = lubridate::as_datetime( runif(10, 1530000000, 1577739600)))
df%>%mutate(Year = format(my_date, '%Y'), Month_Number = as.factor(format(my_date, '%m')),
            Weekday = as.factor(weekdays(my_date)), Hour =as.factor(format(my_date, '%H')),
            Minute =as.factor(format(my_date, '%M')), Week =(format(my_date, '%W')),
            Quarter = lubridate::quarter(my_date, with_year = T))

Google Spreadsheets
9. Version control in Google Docs and spreadsheets
Most data scientists are familiar with Git and GitHub, which are version control tools. However, many people are not aware of the version history in Google documents, spreadsheets, and presentations. Let me show you an example of version history in Google Docs:
- Open your Google document.
- At the top, click File–>Version history.
On the left, you will see the date of the changes as well as the names of the authors. For example, on July 16, 2019, at 4:15 p.m., Giulia Penni made a change:

You can click on any change, and you will see the changes as they are displayed below:

Finally, you can restore the previous state by clicking on the “Restore this version” button:

Linux
10. How to copy a folder in Linux
When you’re working with Linux operating systems like servers, etc., you need to copy-paste folders using the command line. If you want to copy a folder from one destination to another, you can run the following bash command:
cp -R /some/dir/ /some/other/dir/
- If
/some/other/dir/doesn’t exist, it will be created. -Rmeanscopy directories recursively. You can also use-rsince it’s case-insensitive.


