

Let’s assume that we are very good at creating machine learning models and we can create many different and interesting projects. What’s the next step? How can we share our knowledge with the rest? The answer is to make an API.
According to Wikipedia, An application programming interface ( API) is an interface or communication protocol between a client and a server intended to simplify the building of client-side software. Sounds complex but this isn’t the case.
In this tutorial, we will transform this algorithm that returns the most dominant colors of an image into an API.
Let’s see the code.
import PIL
from PIL import Image
import requests
from io import BytesIO
import webcolors
import pandas as pd


import webcolors

def closest_colour(requested_colour):
    min_colours = {}
    for key, name in webcolors. CSS3_HEX_TO_NAMES.items():
        r_c, g_c, b_c = webcolors.hex_to_rgb(key)
        rd = (r_c - requested_colour[0]) ** 2
        gd = (g_c - requested_colour[1]) ** 2
        bd = (b_c - requested_colour[2]) ** 2
        min_colours[(rd + gd + bd)] = name
    return min_colours[min(min_colours.keys())]


def top_colors(url, n=10):
    # read images from URL
    response = requests.get(url)
    img = Image.open(BytesIO(response.content))

    # convert the image to rgb
    image = img.convert('RGB')

    # resize the image to 100 x 100
    image = image.resize((100,100))

    detected_colors =[]
    for x in range(image.width):
        for y in range(image.height):
            detected_colors.append(closest_colour(image.getpixel((x,y))))
    Series_Colors = pd.Series(detected_colors)
    output=Series_Colors.value_counts()/len(Series_Colors)
    return(output.head(n).to_dict())
So what the “top color” function does is given a URL of an image it can return the top 10 dominant colors. Click here for more information.
We have to create a colors.py file with the code above in our working directory so we can import the function to our flask code.
The output of our API, cannot be a Pandas Dataframe. So we will convert it into JSON. An easy way to do this is to return the Dataframe as a dictionary and then in our flask code, using the Jsonify function of flask we can convert it into JSON. That’s why we are using the .to_dict() method in the top_colors function.
Python Rest API Flask Script
So now we have our function, the next step is to create our Flask code. In our working directory we have to create a main.py file with the following code:
from flask import Flask, jsonify, request

app=Flask(__name__)

#we are importing our function from the colors.py file
from colors import top_colors


@app.route("/",methods=['GET','POST'])
def index():
    if request.method=='GET':
#getting the url argument
        url = request.args.get('url')
        result=top_colors(str(url))
        return jsonify(result)
    else:
        return jsonify({'Error':"This is a GET API method"})


if __name__ == '__main__':
    app.run(debug=True,host='0.0.0.0', port=9007)
You don’t have to understand the whole script, just use it as a base for your API projects.
Firstly we have to import our function top_colors from the colors.py file. Using the url = request.args.get(‘url’) we are getting the value of the argument “url” which in our case is the URL of an image.
Then, we are passing this value to our function and we are returning the result using the jsonify library to transform it into a JSON as we said above.
The if statement is for those who will call the API as a POST method so it can return a warning. Lastly, the port is up to you, we are using the 9007.
Finally, we can run the main.py file to test it locally. Just run the following in your terminal:
python main.py
The output will be something like this:
 * Serving Flask app "main" (lazy loading)
 * Environment: production
   WARNING: Do not use the development server in a production environment.
   Use a production WSGI server instead.
 * Debug mode: on
 * Restarting with stat
 * Debugger is active!
 * Debugger PIN: 220-714-143
 * Running on http://0.0.0.0:9007/ (Press CTRL+C to quit)
That means that our API is running on localhost using the 9007 port.
Now we can go to a browser to test it. To add our variable(image URL) in the API’s URL, we have to add it at the end like follows ?variable=. In our example our API’s URL is the following:
http://localhost:9007/?url=[[url of an image]].
So, for example, Let’s say we want to get the dominant colors of the following image from Unsplash:
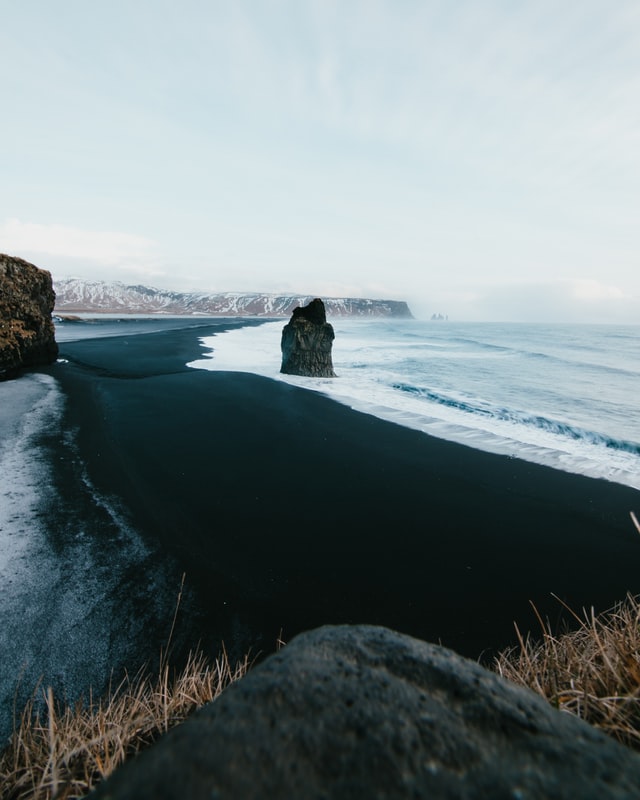
https://images.unsplash.com/photo-1615479865224-b07bb46a5f56?ixid=MXwxMjA3fDB8MHxwaG90by1wYWdlfHx8fGVufDB8fHw%3D&ixlib=rb-1.2.1&auto=format&fit=crop&w=1000&q=80We have to hit the following URL in our browser:
http://localhost:9007/?url=https://images.unsplash.com/photo-1615479865224-b07bb46a5f56?ixid=MXwxMjA3fDB8MHxwaG90by1wYWdlfHx8fGVufDB8fHw%3D&ixlib=rb-1.2.1&auto=format&fit=crop&w=1000&q=80
Then, we will get the following output:
{'black': 0.2843,
 'gainsboro': 0.2812,
 'darkslategray': 0.1889,
 'lavender': 0.0668,
 'lightsteelblue': 0.0448,
 'lightgray': 0.0405,
 'darkgray': 0.0189,
 'darkolivegreen': 0.0172,
 'dimgray': 0.0144,
 'lightslategray': 0.0129}
Success, we got the dominant colors of that image!

The next step is to deploy it on a server. We will show you how to do easily it in our future posts.


3 thoughts on “Python Rest API Example”
Looking forward to the “go live” tutorial!
Very nice content!
Stay Tuned!