

Today, we will provide a walkthrough example of how you can apply character based text generation using RNN and more particularly GRU models in tensorflow. We will run it on colab and as training dataset we will take the “Alice’s Adventures in Wonderland“. In another post we explained how you can apply word based text generation. Feel free to compare the two approaches.
from __future__ import absolute_import, division, print_function, unicode_literals
try:
# %tensorflow_version only exists in Colab.
%tensorflow_version 2.x
except Exception:
pass
import tensorflow as tf
import numpy as np
import os
import time
# Read, then decode for py2 compat.
text = open("11-0.txt" , 'rb').read().lower().decode(encoding='utf-8')
# length of text is the number of characters in it
print ('Length of text: {} characters'.format(len(text)))
# The unique characters in the file
vocab = sorted(set(text))
# print ('{} unique characters'.format(len(vocab)))
# Creating a mapping from unique characters to indices
char2idx = {u:i for i, u in enumerate(vocab)}
idx2char = np.array(vocab)
text_as_int = np.array([char2idx for c in text])
# Show how the first 13 characters from the text are mapped to integers
print ('{} ---- characters mapped to int ---- > {}'.format(repr(text[:13]), text_as_int[:13]))
# Create training examples and targets
# The maximum length sentence we want for a single input in characters
seq_length = 100
examples_per_epoch = len(text)//(seq_length+1)
# Create training examples / targets
char_dataset = tf.data.Dataset.from_tensor_slices(text_as_int)
# The batch method lets us easily convert these individual characters to sequences of the desired size.
sequences = char_dataset.batch(seq_length+1, drop_remainder=True)
# For each sequence, duplicate and shift it to form the input and target text by using the map method to apply a simple function to each batch:
def split_input_target(chunk):
input_text = chunk[:-1]
target_text = chunk[1:]
return input_text, target_text
dataset = sequences.map(split_input_target)
# Create training batches
# Batch size
BATCH_SIZE = 64
# Buffer size to shuffle the dataset
# (TF data is designed to work with possibly infinite sequences,
# so it doesn't attempt to shuffle the entire sequence in memory. Instead,
# it maintains a buffer in which it shuffles elements).
BUFFER_SIZE = 10000
dataset = dataset.shuffle(BUFFER_SIZE).batch(BATCH_SIZE, drop_remainder=True)
# Build The Model
# Use tf.keras.Sequential to define the model. For this simple example three layers are used to define our model:
# tf.keras.layers.Embedding: The input layer. A trainable lookup table that will map the numbers of each character to a vector with embedding_dim
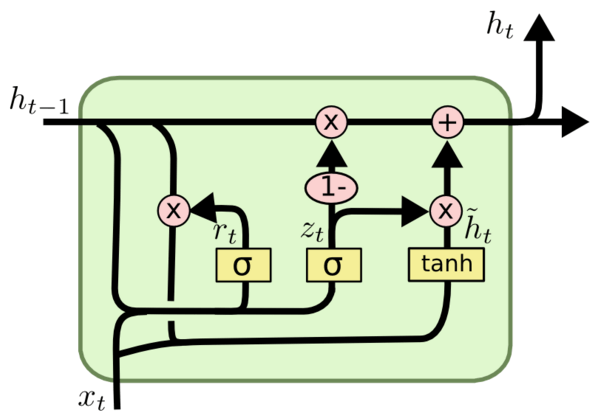
# tf.keras.layers.GRU: A type of RNN with size units=rnn_units (You can also use a LSTM layer here.)
# tf.keras.layers.Dense: The output layer, with vocab_size outputs.
# Length of the vocabulary in chars
vocab_size = len(vocab)
# The embedding dimension
embedding_dim = 256
# Number of RNN units
rnn_units = 1024
def build_model(vocab_size, embedding_dim, rnn_units, batch_size):
model = tf.keras.Sequential([
tf.keras.layers.Embedding(vocab_size, embedding_dim,
batch_input_shape=[batch_size, None]),
tf.keras.layers.GRU(rnn_units,
return_sequences=True,
stateful=True,
recurrent_initializer='glorot_uniform'),
tf.keras.layers.GRU(rnn_units,
return_sequences=True,
stateful=True,
recurrent_initializer='glorot_uniform'),
tf.keras.layers.Dense(vocab_size)
])
return model
model = build_model(
vocab_size = len(vocab),
embedding_dim=embedding_dim,
rnn_units=rnn_units,
batch_size=BATCH_SIZE)
for input_example_batch, target_example_batch in dataset.take(1):
example_batch_predictions = model(input_example_batch)
print(example_batch_predictions.shape, "# (batch_size, sequence_length, vocab_size)")
model.summary()
Model: "sequential_4"
_________________________________________________________________
Layer (type)                 Output Shape              Param #
=================================================================
embedding_4 (Embedding)      (64, None, 256)           15616
_________________________________________________________________
gru_4 (GRU)                  (64, None, 1024)          3938304
_________________________________________________________________
gru_5 (GRU)                  (64, None, 1024)          6297600
_________________________________________________________________
dense_4 (Dense)              (64, None, 61)            62525
=================================================================
Total params: 10,314,045
Trainable params: 10,314,045
Non-trainable params: 0
________________________________
# The standard tf.keras.losses.sparse_categorical_crossentropy loss function works in this case because it is applied across the last dimension of the #predictions.

# Because our model returns logits, we need to set the from_logits flag.

def loss(labels, logits):
  return tf.keras.losses.sparse_categorical_crossentropy(labels, logits, from_logits=True)

example_batch_loss  = loss(target_example_batch, example_batch_predictions)
print("Prediction shape: ", example_batch_predictions.shape, " # (batch_size, sequence_length, vocab_size)")
print("scalar_loss:      ", example_batch_loss.numpy().mean())

# Configure the training procedure using the tf.keras.Model.compile method. We'll use tf.keras.optimizers.Adam with default arguments and the loss #function.

model.compile(optimizer='adam', loss=loss)

# Directory where the checkpoints will be saved
checkpoint_dir = './training_checkpoints'
# Name of the checkpoint files
checkpoint_prefix = os.path.join(checkpoint_dir, "ckpt_{epoch}")

checkpoint_callback=tf.keras.callbacks.ModelCheckpoint(
    filepath=checkpoint_prefix,
    save_weights_only=True)

EPOCHS=100
history = model.fit(dataset, epochs=EPOCHS, callbacks=[checkpoint_callback])

# Generate text
# Restore the latest checkpoint

# To keep this prediction step simple, use a batch size of 1.
# Because of the way the RNN state is passed from timestep to timestep, the model only accepts a fixed batch size once built.
# To run the model with a different batch_size, we need to rebuild the model and restore the weights from the checkpoint.

tf.train.latest_checkpoint(checkpoint_dir)

model = build_model(vocab_size, embedding_dim, rnn_units, batch_size=1)

model.load_weights(tf.train.latest_checkpoint(checkpoint_dir))

model.build(tf.TensorShape([1, None]))

model.summary()
Model: "sequential_5"
_________________________________________________________________
Layer (type)                 Output Shape              Param #
=================================================================
embedding_5 (Embedding)      (1, None, 256)            15616
_________________________________________________________________
gru_6 (GRU)                  (1, None, 1024)           3938304
_________________________________________________________________
gru_7 (GRU)                  (1, None, 1024)           6297600
_________________________________________________________________
dense_5 (Dense)              (1, None, 61)             62525
=================================================================
Total params: 10,314,045
Trainable params: 10,314,045
Non-trainable params: 0
_______________________________
# The prediction loop
def generate_text(model, start_string):
  # Evaluation step (generating text using the learned model)

  # Number of characters to generate
  num_generate = 1000

  # Converting our start string to numbers (vectorizing)
  input_eval = [char2idx[s] for s in start_string]
  input_eval = tf.expand_dims(input_eval, 0)

  # Empty string to store our results
  text_generated = []

  # Low temperatures results in more predictable text.
  # Higher temperatures results in more surprising text.
  # Experiment to find the best setting.
  temperature = 1.0

  # Here batch size == 1
  model.reset_states()
  for i in range(num_generate):
      predictions = model(input_eval)
      # remove the batch dimension
      predictions = tf.squeeze(predictions, 0)

      # using a categorical distribution to predict the word returned by the model
      predictions = predictions / temperature
      predicted_id = tf.random.categorical(predictions, num_samples=1)[-1,0].numpy()

      # We pass the predicted word as the next input to the model
      # along with the previous hidden state
      input_eval = tf.expand_dims([predicted_id], 0)

      text_generated.append(idx2char[predicted_id])

  return (start_string + ''.join(text_generated))

print(generate_text(model, start_string=u"alice was not a bit hurt"))
Text Generation
Let’s see the output of the “generate_text” function!
alice was not a bit hurt, and the mock turtle had just begun
to repeat it, when a crowd out when they both be seen a a corne, the dormouse fell asleep insat on, with closed eyes, and half believed herself in
wonderland, though she knew she had but to open ain. gryphon. ‘it’s all her fancy, that: they never
executes nobody, you know. come on!’

‘everybody sleepy, and nothing else to say buck the rest of the
pack, she could not tell whether they were gardeners at occe, and looked at her any
more if you’d rather not.’

‘we indeed!’ cried the mouse, the poor little thing was said to livent all a proper way of expressidy to play
croquet with the
as soon as the jury had and she tried her
best to climble yourself to say it any longle silent.

the dormouse had closed its eyes by this time, and was going off into
a doze; but, on before the end of the trial.’

‘stupid things!’ alice began in a loud, indignant voice, but she stood looking at the house, and the
march hare and the hatter were having head
Comments
The “character model” takes as an input a sequence of characters and it tries to predict the next one. In our case, the characters were in lower case and we kept the punctuations. We decided to generate the 100 next characters taking as starting text the “alice was not a bit hurt“, but we could have chosen any other starting text as well as to change the number of predictive characters since it is a parameter in “generate_text” function. As we can see from the output, there were some “spelling” mistakes as well as some grammatical mistakes, but for sure the generated text was surreal without meaning. Maybe because we were in Alice’s Wonderland 😉


2 thoughts on “Character Level Text Generation”