

Have you ever needed to extract data from a website, but found yourself sifting through pages of HTML code? Fortunately, there’s a better way: with Selectorlib, a powerful tool for web scraping in Python. As we mentioned in our previous post about Selenium, web scraping can be done with plain Selenium, but it can be difficult and time-consuming to locate the elements you want to scrape. Selectorlib, on the other hand, simplifies the process by allowing you to extract data using simple CSS selectors. And the best part? It’s incredibly easy to use, especially with its Chrome extension. In this tutorial, we’ll show you how to get started with Selectorlib and walk you through the process of scraping a website step by step.
In this tutorial, we will use only the Requests library to scrape websites. This is because using Selenium can add additional complexity and overhead, and we want to keep things as simple as possible. We’ll be scraping a basic website, namely http://quotes.toscrape.com/, which contains quotes from famous people. This site is perfect for our purposes, as it allows us to demonstrate how to extract data from a simple and straightforward page using Selectorlib. So, let’s get started!
First things first are to add the Selectorlib extension to your browser and install the Selectorlib library running the following:
pip install selectorlib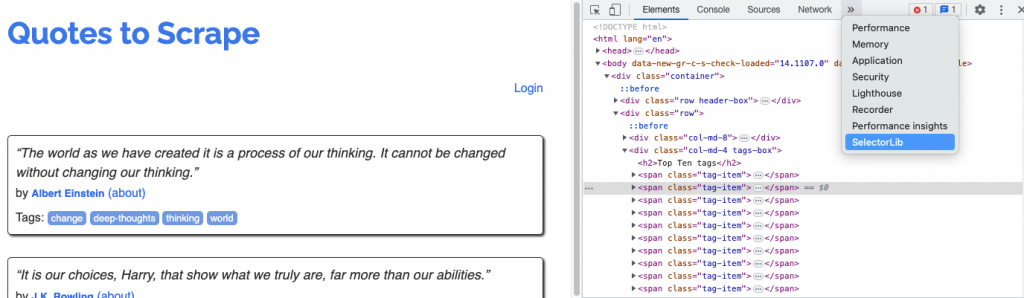
Once you have installed the Selectorlib Chrome extension, you can navigate to the website you want to scrape. Next, right-click on the page and select “Inspect”. This will open the Chrome Developer Tools panel. From there, you can find the Selectorlib extension by clicking on the “Selectorlib” tab, as shown in the following screenshot:
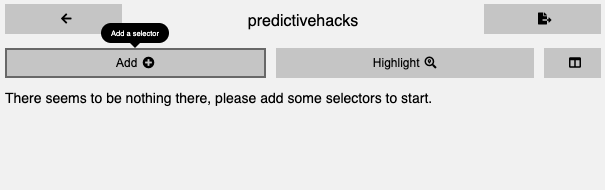
We first need to create a template that defines what information we want to scrape. To do this, we can use the Selectorlib Chrome extension. In the Selectorlib tab, we can create a new template and start adding elements by clicking the “Add” button.
For each element, we need to specify the data type (e.g., text, link, image) and give it a selector name. Then, we can add a CSS selector or an XPath expression to identify the element on the page. This is where Selectorlib really shines, as we can simply click the “Select element” button and navigate to the element we want to extract.
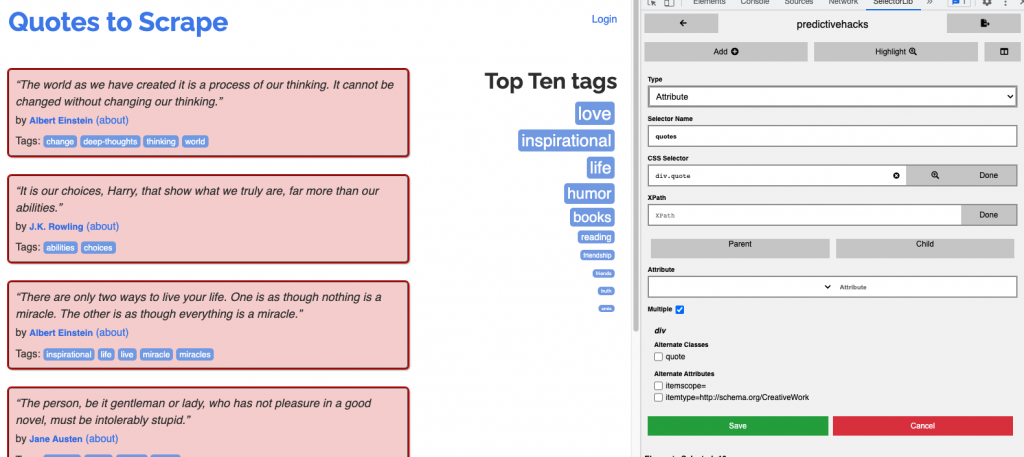
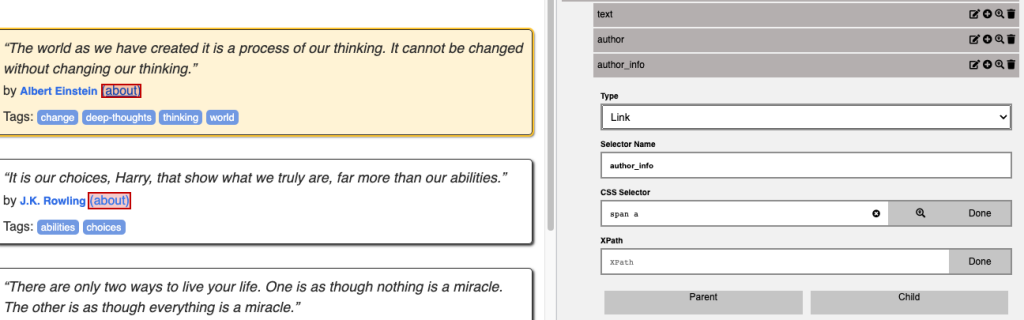
Firstly, we need to select the main element that contains all the element features that are repeated on the page. In our case, it’s the quote boxes, and the attributes we will extract are the text, the author, and the author info page.
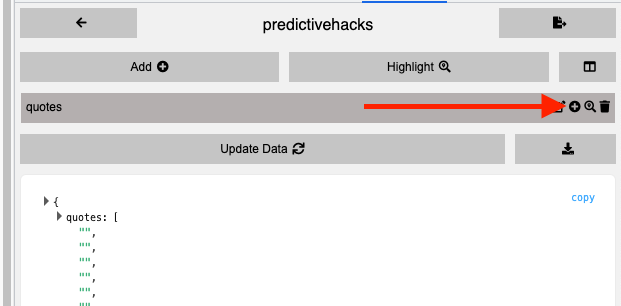
Moving on, we can add the quote attributes starting with the text attribute. We can easily add new attributes by clicking the plus icon within the “quotes” element we previously created, as demonstrated in the following photo.
Once again, we’ll use the same approach as earlier by clicking the “Select Element” button and choosing the desired elements, just as we did before. It’s crucial to specify the type of elements we want to extract, whether it’s text, Link, image, or attribute.

I did the same for the author info URL specifying the type of the element as Link.
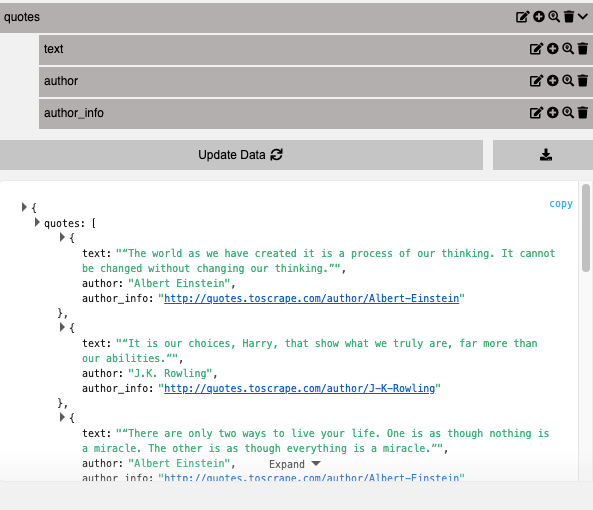
These are the data we want to extract. To ensure that we’re obtaining the appropriate information, we can verify it using Selectorlib’s user interface, as illustrated in the screenshot below.
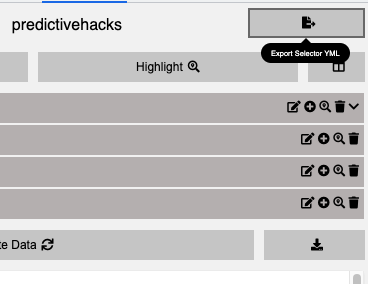
If everything looks good, you can now extract the Selector YML file to use it in our Python code.
Scraping the data in Python
We’re now ready to implement Selectorlib into our Python code. The first step is to utilize the ‘requests’ library to retrieve the page’s source code.
import pandas as pd
import numpy as np
import requests

scraping=requests.get("http://quotes.toscrape.com/")

print(scraping.text[:1000])
'<!DOCTYPE html>\n<html lang="en">\n<head>\n\t<meta charset="UTF-8">\n\t<title>Quotes to Scrape</title>\n <link rel="stylesheet" href="/static/bootstrap.min.css">\n <link rel="stylesheet" href="/static/main.css">\n</head>\n<body>\n <div class="container">\n <div class="row header-box">\n <div class="col-md-8">\n <h1>\n <a href="/" style="text-decoration: none">Quotes to Scrape</a>\n </h1>\n </div>\n <div class="col-md-4">\n <p>\n \n <a href="/login">Login</a>\n \n </p>\n </div>\n </div>\n \n\n<div class="row">\n <div class="col-md-8">\n\n <div class="quote" itemscope itemtype="http://schema.org/CreativeWork">\n <span class="text" itemprop="text">“The world as we have created it is a process of our thinking. It cannot be changed without changing our thinking.”</span>\n <span>by <small class="author" itempr'At this stage, we will create an extractor using the YML file we created.
from selectorlib import Extractor

# Create an Extractor by reading from the YAML file
e = Extractor.from_yaml_file('predictivehacks.yml')

data = e.extract(scraping.text)
data
{'quotes': [{'text': '“The world as we have created it is a process of our thinking. It cannot be changed without changing our thinking.”',
   'author': 'Albert Einstein',
   'author_info': '/author/Albert-Einstein'},
  {'text': '“It is our choices, Harry, that show what we truly are, far more than our abilities.”',
   'author': 'J.K. Rowling',
   'author_info': '/author/J-K-Rowling'},
  {'text': '“There are only two ways to live your life. One is as though nothing is a miracle. The other is as though everything is a miracle.”',
   'author': 'Albert Einstein',
   'author_info': '/author/Albert-Einstein'},
  {'text': '“The person, be it gentleman or lady, who has not pleasure in a good novel, must be intolerably stupid.”',
   'author': 'Jane Austen',
   'author_info': '/author/Jane-Austen'},
  {'text': "“Imperfection is beauty, madness is genius and it's better to be absolutely ridiculous than absolutely boring.”",
   'author': 'Marilyn Monroe',
   'author_info': '/author/Marilyn-Monroe'},
  {'text': '“Try not to become a man of success. Rather become a man of value.”',
   'author': 'Albert Einstein',
   'author_info': '/author/Albert-Einstein'},
  {'text': '“It is better to be hated for what you are than to be loved for what you are not.”',
   'author': 'André Gide',
   'author_info': '/author/Andre-Gide'},
  {'text': "“I have not failed. I've just found 10,000 ways that won't work.”",
   'author': 'Thomas A. Edison',
   'author_info': '/author/Thomas-A-Edison'},
  {'text': "“A woman is like a tea bag; you never know how strong it is until it's in hot water.”",
   'author': 'Eleanor Roosevelt',
   'author_info': '/author/Eleanor-Roosevelt'},
  {'text': '“A day without sunshine is like, you know, night.”',
   'author': 'Steve Martin',
   'author_info': '/author/Steve-Martin'}]}
As you can see, we’ve effectively extracted the desired data in a well-organized structure. By utilizing Selenium, we can integrate this approach into more intricate web scraping tasks, such as page navigation and more.
Summing it up
In this article, we explore Selectorlib, a robust tool for web scraping in Python that allows you to easily extract data using simple CSS selectors. Selectorlib simplifies the process of web scraping by eliminating the need to sift through pages of HTML code, making it a much more efficient approach compared to plain Selenium. With Selectorlib, you can scrape websites with ease and obtain data in a structured format. The tutorial focuses on using only the Requests library to scrape a simple website containing famous quotes, demonstrating how to extract data step by step. Overall, Selectorlib is a straightforward and powerful solution for web scraping that can save you time and effort.


