

In a previous tutorial, we showed you how to get started with Python UDFs in Python. In this tutorial, we will show you how to use SpaCy with Python UDF in Snowflake.
Download the SpaCy Model
The first that we need to do is to download the “en_core_web_sm” model and then upload it to the stage. You can download the SpaCy library using conda or pip and then you can search for the “en_core_web_sm” by running a find command like:
find . -name "en_core*" -print
In my case, the model is under the path:
./Anaconda3/Lib/site-packages/en_core_web_sm
Then, we can go to this path and zip the folder.

Finally, should upload the “en_core_web_sm.zip” file to the stage, as we will see later.
Create the Python Function that Redacts NERs
Then we need to create a Python function that redacts name entities with SpaCy. The function is the following:
import spacy
nlp = spacy.load("en_core_web_sm")

def replace_ner(mytxt):
    clean_text = mytxt
    doc = nlp(mytxt)
    for ent in reversed(doc.ents):
        clean_text = clean_text[:ent.start_char] +ent.label_ + clean_text[ent.end_char:]
    return clean_text
Create the UDF in Snowflake
Now we are ready to build the UDF in Snowflake. Note that the code below uses file locks to ensure that the extraction is synchronized across Python worker processes; this way, contents are unzipped only once. Also, keep in mind that the version of our model was the en_core_web_sm-3.0.0 where you can find it within the path of the folder (i.e. en_core_web_sm/en_core_web_sm-3.0.0').
Let’s build the function called redact_ner.
create or replace function redact_ner(str string)
   returns string
   language python
   runtime_version = 3.8
   handler = 'replace_ner'
   packages = ('spacy')
   imports = ('@MY_S3_TEST_SNOWFLAKE_STAGE/en_core_web_sm.zip')
   as
$$
import fcntl
import os
import spacy
import sys
import threading
import zipfile

# File lock class for synchronizing write access to /tmp
class FileLock:
   def __enter__(self):
      self._lock = threading.Lock()
      self._lock.acquire()
      self._fd = open('/tmp/lockfile.LOCK', 'w+')
      fcntl.lockf(self._fd, fcntl.LOCK_EX)

   def __exit__(self, type, value, traceback):
      self._fd.close()
      self._lock.release()

# Get the location of the import directory. Snowflake sets the import
# directory location so code can retrieve the location via sys._xoptions.
IMPORT_DIRECTORY_NAME = "snowflake_import_directory"
import_dir = sys._xoptions[IMPORT_DIRECTORY_NAME]

# Get the path to the ZIP file and set the location to extract to.
zip_file_path = import_dir + "en_core_web_sm.zip"
extracted = '/tmp/en_core_web_sm'

# Extract the contents of the ZIP. This is done under the file lock
# to ensure that only one worker process unzips the contents.
with FileLock():
   if not os.path.isdir(extracted + '/en_core_web_sm/en_core_web_sm-3.0.0'):
      with zipfile.ZipFile(zip_file_path, 'r') as myzip:
         myzip.extractall(extracted)

# Load the model from the extracted file.
nlp = spacy.load(extracted + "/en_core_web_sm/en_core_web_sm-3.0.0")

def replace_ner(mytxt):
    clean_text = mytxt
    doc = nlp(mytxt)
    for ent in reversed(doc.ents):
        clean_text = clean_text[:ent.start_char] +ent.label_ + clean_text[ent.end_char:]
    return clean_text
$$;
Apply the Function
We can apply the function to a dummy dataset. Let’s create the following temporary table called MY_DOCUMENTS such as:
CREATE OR REPLACE TEMP TABLE MY_DOCUMENTS
(DOCUMENT STRING)

INSERT INTO MY_DOCUMENTS values
('Apple is looking at buying U.K. startup for $1 billion'),
('San Francisco considers banning sidewalk delivery robots'),
('Amazon is hiring a new vice president of global policy'),
('George Pipis works for Predictive Hacks'),
('Today is Wednesday, 18:00'),
('Dear George, can you please respond to my email?')


select * from MY_DOCUMENTS

Now, let’s redact the detected NERs.
select document, redact_ner(document) as clean_document from MY_DOCUMENTS

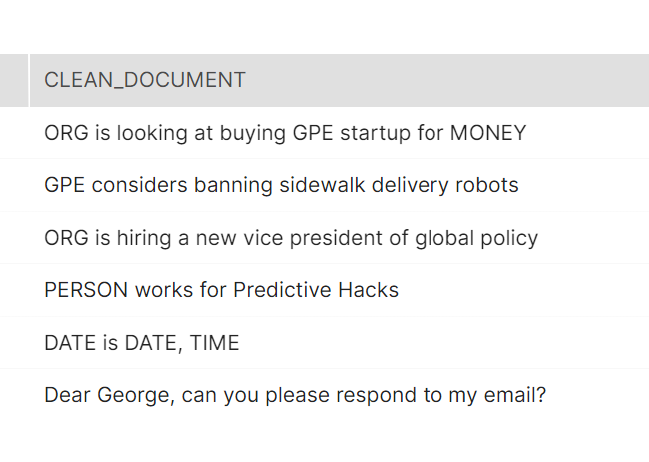
As we can see, SpaCy was able to detect some entities but it failed to detect the “NAME” in “Dear George” and the “ORG” in Predictive Hacks. However, it detected correctly the $1 billion, Apple, Amazon, San Francisco, Today, Wednesday, 18:00, and George Pipis.
Finally, notice that when we run the query the results appear in a different order but this is not a problem since the mapping between columns is correct.


